Preferences editor can be found in the tools menu, or by right-clicking in the workspace window. Below is a short description of each option.
In this section:
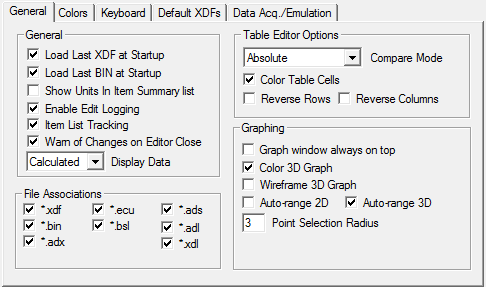
Load Last XDF at Startup - If checked, the XDF file that you specify as default will open automatically when you load TunerPro.
Load Last BIN at startup - If checked, the last opened bin will open next time you start TunerPro.
Show Units in Item Summary List - If checked, the item's units are outputted to the value column of the Item Summary List.
Enable Edit Logging - If checked, changes made to a bin are logged in a plain text file. If the currently edited bin resides as c:\MyBin.bin, the log file will reside as c:\MyBin.log.
Item List Tracking - If checked, when an editor is made active (brought to the top of all editors) in the workspace, it is selected in the XDF Item Tree and the Item Summary List.
Warn of Changes on Editor Close - If checked, you will be prompted to save any unsaved changes when closing the bin editor. If no changes have been made since you last applied changes or since opening the editor, you will not be prompted.
Display Data - Setting this to Hex causes all parameters to be shown as they appear in the bin file - in raw hex. If you choose to show calculated values, each hex byte will be calculated using the XDF parameters and displayed in the editor(s).
Compare Mode - if set to edit - compare, when compare mode is selected in the table editor, the difference between the editable bin data and the compare bin data is shown. Also toggled from the Table Editor Toolbox.
Color Table Cells - When checked, table cells are colored based on the table-defined maximum and minimum values. If no max/min is set, the cells will not be colored.
Reverse Rows - When checked, row (Y-axis) order is reversed in the table editor.
Reverse Columns - When checked, column (X-axis) order is reversed in the table editor.
Graph window always on top - If checked, the graph window stays above the main window at all times.
Color 3D Graph - If selected, the surface (or data points) in a 3D graph is colored to represent relative values. The highest point (and points near it in value) get a darker red. The lowest point (and points near it in value) get a darker blue. Points in-between are colored within the resulting gradient. This is real time, so if the highest or lowest point changes position, all points are re-colored.
Wireframe 3D Graph - If selected, the 3D graph's surface is not shaded, allowing you to "see through" the graph. This sometimes makes it simpler to see points that might otherwise be hidden.
Auto-range 2D / Auto-range 3D - If selected, the X/Y (2D) or Z (3D) visual range will automatically be adjusted to the maximum and minimum values within the graph.
Point Selection Radius - This value adjusts the visual size and "selection grip" of data points in the 2D/3D chart. A larger value draws a larger circle around selected points and makes it easier to select points, but takes up more space in the chart.
File Associations - You can select/de-select files that you'd like to have associated with TunerPro. Files associated with TunerPro will have icons associated with them in Windows. When they are double clicked, if TunerPro is already open, the file will be displayed in the current TunerPro window. If TunerPro is not open, TunerPro will open up displaying the file.
File types:
*.ecu - ECU files (bin definitions) - These files
contain the data needed to display the information contained in a bin file.
*.bin - Bins (chip images) - These files contain the chip's data.
*.bsl - Bin Stacker layouts. These files contain layout information for stacking
bins, including file paths and chip properties
*.adl - (RT only) - ALDL Data Log. These files open with the ALDL Communication
tool.
*.ads - (RT only) - ALDL Datastream Definition. These files contain the information
needed to display ALDL data.
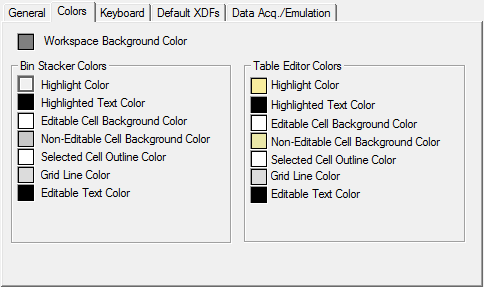
| Workspace Background Color | This is the background color of the main workspace. Defaults to Dark Gray. |
| Highlight Color | Color of the highlighted row |
| Highlight Text Color | Color of highlighted text |
| Editable Cell Background Color | Color of a cell in which you can type |
| Non-Editable Cell Background Color | Color of a cell in which you cannot type |
| Selected Cell Outline Color | Color of the line drawn around the active cell |
| Grid line Color | Color of the table grid lines |
| Editable Text Color | Color of editable text |
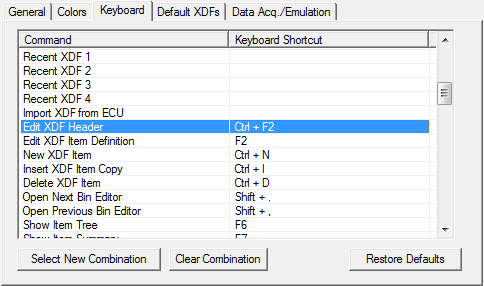
Most of the commands in the main application menu can be accessed by keyboard shortcuts. Those keyboard shortcuts can be edited through the "Keyboard" tab of the preferences editor.
Since keyboard shortcuts are generally global to TunerPro, be careful not to assign a shortcut to a key combination that you may use for other reasons within the application. For instance, assigning a shortcut to the arrow keys may affect your ability to navigate the table editor cursor with the arrow keys.
To edit a command's keyboard shortcut:
|
Note: Keyboard shortcuts can contain any combination of Shift, Alt, and Control, and must contain an ASCII character, function key, or navigation key (up, down, left, right, home, end, page up, page down, etc). |
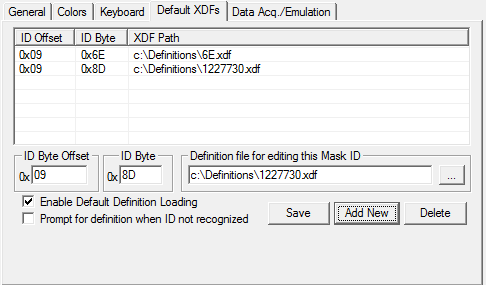
Default bin definitions are bin definitions that load automatically when a bin with the specified value at the specified offset is loaded. In the screenshot above, for instance, 6Ev010.ecu will be loaded anytime a bin with 0x6E at offset 0x09 is opened.
To make use of default definitions you must check the "Enable Default Definition Loading" checkbox. If "Prompt for definition when ID not recognized" is checked, then TunerPro will prompt you for the definition file if none of the default definitions match the currently loaded bin.
Adding a new default definition:
1) Enter the ID byte offset
in hex in the "Mask ID Offset" text box.
2 ) Enter the ID byte that identifies the type of bin in the "ID Byte"
text box.
3 ) Type or browse to the definition you'd like to load when this bin is loaded
by clicking the "..." button in the "Definition file for editing
this Mask ID" text box.
4) Press the "add new" button.
Editing a default definition entry:
1) Click on the entry you'd like to edit
2) Alter the information in the text boxes you wish to change
3) Press the "Save" button. This saves the new data for the current
definition
Deleting a default definition entry
1) Select the entry you wish to delete
2) Press the "Delete" button
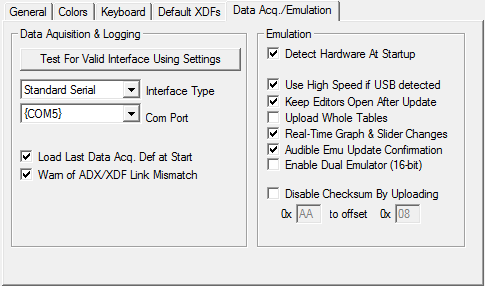
Test For Valid Cable Using Settings (MAX232/2-Trans/AP-Passthrough only) - Click this button to determine if your interface can be detected using the settings you've entered. Ensure your cable is connected to the PC before attempting (it does not need to be connected to the vehicle).
Interface Type - Select the type of hardware you'll be using to connect to the data stream. Default is "Standard Serial". Use this setting for "normal" COM streams, such as 2-transistor and MAX232/233 type GM ALDL interfaces, and the AutoProm in hardware bypass mode, or USB to COM port adapted cables such as the Moates ALDU1 USB ALDL Cable. Use "AutoProm" if you will be using a Moates AutoProm for acquisition (in software mode). If AutoProm is selected, the COM port is auto-detected. Use "Shared Port" for hardware such as the Quarterhorse, where the Data Acquisition Engine will communicate by piggybacking on the existing connection to the emulation hardware, passing commands directly to it.
Com Port (Standard Serial) - Select the serial communications port you wish to use to communicate with the interface. Only COM ports that are detected on the system will be listed here. The previous port will be listed in brackets ( {} ) if the port is no longer available on the system (perhaps because the interface is not currently plugged in).
Load Last Data Acq. Def at Start - When checked, the most recently loaded Datastream Definition (ADX) will be loaded when TunerPro starts.
Detect Hardware at Startup - If enabled, emulation hardware is detected at application startup. Hardware can be detected using "Initialize Attached Devices" in the tools menu.
Use High Speed if USB detected - If enabled and the attached emulation hardware is USB, TunerPro will initialize the hardware to use the highest communication speed possible. Disable this if your computer has inconsistencies communicating with the hardware.
Keep Editors Open After Update - When checked, constant, flag, and table editor windows will remain open after the update/save button is pressed while emulating. This makes it more convenient to focus on a single item while testing changes.
Upload Whole Tables - If selected, anytime a change is made in a table, the entire table is uploaded upon update. If not selected, only edited cells are updated on the emulator. Leaving this unselected means less data is likely to be uploaded to the emulator and reduces the chances of the car hiccupping. Checking this ensures that all data is accurately uploaded to the emulator. Default is unchecked.
Real-Time Graph and Slider Changes - If checked, the emulation buffer is updated with the change when a data point is released in a 2D/3D graph or the slider handle (in a constant editor) is released. This allows you to make changes via the graphs in real-time without have to click update afterwards.
Enable Dual Emulator (16-bit) - If checked, TunerPro will detect two emulators attached to the PC, and will mirror all I/O to both emulators. Some 16-bit applications, such as certain Nissans, can be emulated with this feature.
Disable Checksum By Uploading - If checked, the specified hex byte will be uploaded to the specified offset automatically when you upload the entire bin to the emulation buffer via the "upload" button in the emulation toolbox. Only some vehicles, such as GM OBDI vehicles, support this feature.