The XDF Header Definition Editor |
Clicking the "View/Edit XDF Header Info" button brings up the XDF Item Editor.
General Tab:
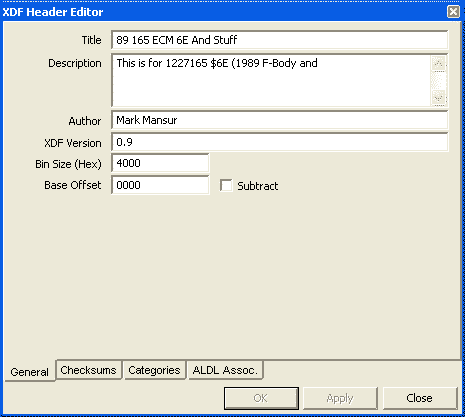
This tab allows you to edit the general properties of the entire XDF file. Below is a description of each field.

Title - Use this field to assign an informative name for your XDF.
Description - Use this field to enter a description or the XDF. You can enter information on the intended application, notes, etc.
Author - This field contains the Author's name.
XDF Version - This field contains a string identifying the version of the XDF file.
Bin Size (Hex)- This is the size of the bin file in bytes that is viewed/edited with this XDF. This number should be entered in hex and should accurately reflect the size of the bin being edited, even if the bin is a stacked version of a smaller bin, i.e. if you're editing a 32k padded version of a 16k bin.
Base Offset - The offset specified here is either added (if the "subtract" checkbox is unchecked) or subtracted ("Subtract" is checked) from the base address of each item defined in the XDF. This is useful for quickly and easily allow the XDF to edit a stacked bin (a bin that has padding at the beginning). For instance, if you have a 16k bin sitting in the upper portion of a 32k file, you can specify an offset of 0x4000. An object may then have a base address of 0xF0, however, the item will be edited at offset 0x40F0 in the bin. Alternately, this field can also be used for ECMs that reference items from an offset. For instance, in DSM applications, the first byte in a bin is referenced by the ECM as 0x8000. When editing the bin, it makes more sense to have the items defined per the addressing the ECM uses. For this, enter 0x8000 as the offset and select "Subtract". An item that has a base address defined as 0x80F0 actually references address 0x80F0 - 0x8000, or 0xF0 in the bin.
Checksums Tab:
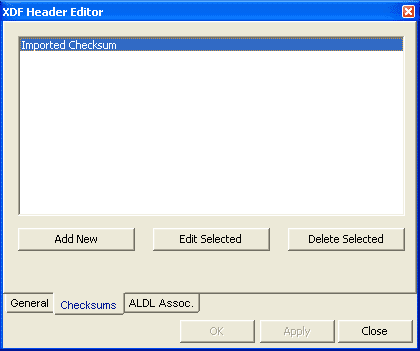
This tab defines the checksums that should be calculated when a bin being edited by the XDF is saved or updated. You can define as many checksums as you need.

Add New - Clicking this adds a new checksum and brings up the checksum editor (see below).
Edit Selected - Selecting a checksum in the list and clicking this allows you to edit an existing checksum by bringing up the checksum editor.
Delete Selected - Selecting a checksum in the list and clicking this deletes the selected checksum.
Checksum Editor:
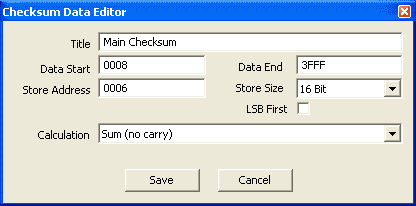
The checksum editor allows you to create or edit a checksum.

Title - Enter a title for the checksum for easy identification
Data Start - Enter the address that represents the beginning of the block for which the checksum will be calculated
Data End - Enter the address representing the end of the block for which the checksum will be calculated
Store Address - This is the address at which the resulting checksum will be stored within the bin
Store Size - This is the size, in bits, of the resulting checksum
Calculation - This drop list allows you to select a predefined checksum calculation routine. Below are descriptions of each calculation routine:Sum (no carry) - Each byte in the block is added together with no carry (i.e. if the checksum is 8 bit, 0xFF + 1 = 0x00). This is the default for many ECMs, including GM.
Categories:
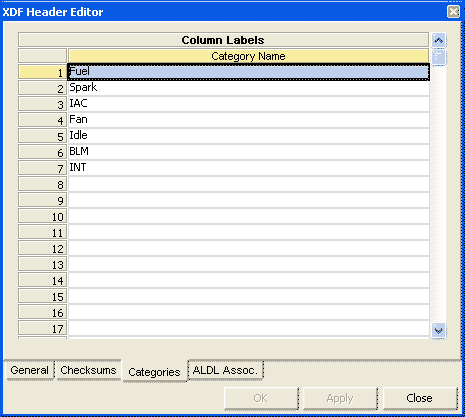
This tab allows you to create categories to which you can assign items in the definition. Categories allow the user to easily show/hide items based on a commonality.

You can assign up to 20 categories. It is recommended that you assign categories sequentially and contiguously. Categories without names (left blank) will have default names assigned to them ("Category 10" for instance).
Once categories are created, you can assign items to categories in their respective editors.
Note: Changing a currently defined category name will change the name globally for items assigned to that category. So changing a category name from "Fuel" to "Spark" will result in all items previously assigned to the "Fuel" category to now be assigned to the "Spark" category.
ALDL Association:
The ALDL association tab allows you to link the XDF file with an ALDL definition (ADS) file. Once linked in the header, you can link XDF items to ADS items, making it much easier to correlate the engine's performance to specific tuning variables.
Note that the path to the linked ADS file is relative. If you wish to distribute the XDF and ADS together, you'll need to ensure that you distribute the directory structure with it. If your ADS file is a directory below your XDF file, i.e. c:\foo.xdf and c:\bar\ed.ads, you'll need to make the end user aware that the ADS file should be placed in a subdirectory (called "bar" in this example). For this reason, it is often simplest to place the XDF and ADS in the same directory and link them.
See Also:
ALDL Data Tracing
TunerPro Help V1.2 Compiled 7/8/09 21:12